Download PRONETA Basic 3.2 - Diagnostics Tool for PROFINET - GoogleDrive Link
PRONETA Basic is a simple PROFINET network analyzer designed for rapid analysis and configuration of PROFINET networks, as well as simple testing of ET 200 distributed IO systems and other components.
PRONETA Basic is well suited for completing two critical tasks during the commissioning of PROFINET installations:
- The "Network Analysis" task provides a quick overview of the PROFINET-connected devices. It includes simple configuration options such as setting network parameters and assigning a network name to devices on the PRONETA PC's subnet. The application also includes powerful mechanisms for comparing different network topologies, such as comparing a "ideal" topology intended for a project with the actual installation.
- The "IO Test" task is a quick and easy way to test the IO wiring of a large installation with many distributed IO devices. It allows for wiring checks and will automatically create a test procedure protocol that can be exported for documentation purposes.
Both tasks can be completed before a CPU is added to the network. Because no other engineering tools are required, PRONETA Basic enables quick and easy checks of system configuration from the start.
New features of PRONETA Basic V3.2
- Support for the IO test of central IO modules of most SIMATIC S7-1500 CPUs and ET 200SP CPUs.
- Read out diagnostic information for all devices
- Include devices found via IP forwarding in other subnets
- Various bugfixes and performance improvements
Link download PRONETA Basic 3.2 - Google Drive High speed link
- Proneta_3_2_0_0.zip: High speed link | Original link
Tutorial to fix device not found error from TIA Portal
When you download the program from TIA Portal to PLC if you get an error like below, you can use PRONETA to fix that error.
Error: no accessible device found in selected network
1. Extract file downloaded.
2. Run file PRONETA.exe
3. When PRONETA opened, click select Network Analysis
4. Continue, select Select Adapter
5. Select your ethernet card
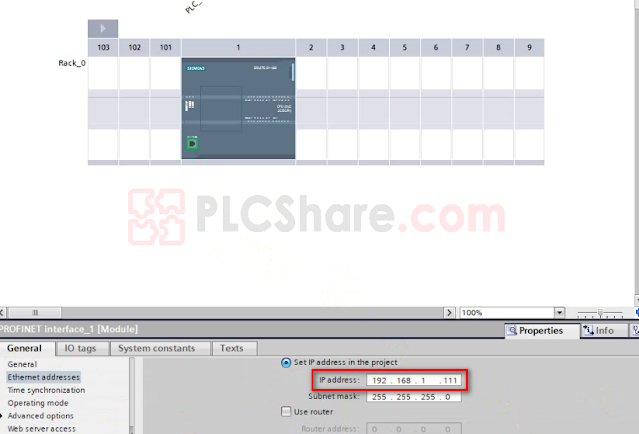
6. When it is connected with your PLC, you can see IP Address of PLC, remember it. Here is 192.168.1.111
7. Change IP Address PLC in TIA Portal same with IP Address above.
8. Change static IP address your computer, same Gateway.
9. The last, download to PLC and select same image below.
Thanks for Reading!


1 comment